

エミュレータでファミコンを遊ぶ時、本物のコントローラーで遊べたらいいのになと思っていたら、簡単にUSB接続のゲームパッドが作れたのでご紹介します。
コントローラの改造
用意するもの

- ファミコンのコントローラー(Iコン)
- ATmega32U4 Pro micro Arduino互換ボード
- USBケーブル
これだけです。ファミコンのコントローラはハードオフのジャンクを買って取り外します。「ATmega32U4 Pro micro Arduino互換ボード」はいろいろな種類の互換ボードが販売されているので、なるべく小さいのを選んでください。
分解

コントローラーの背面のネジを6か所外すと、裏蓋が外れ、基板が分離できます。Arduinoの基板はこんな感じに収めようと思います。
配線
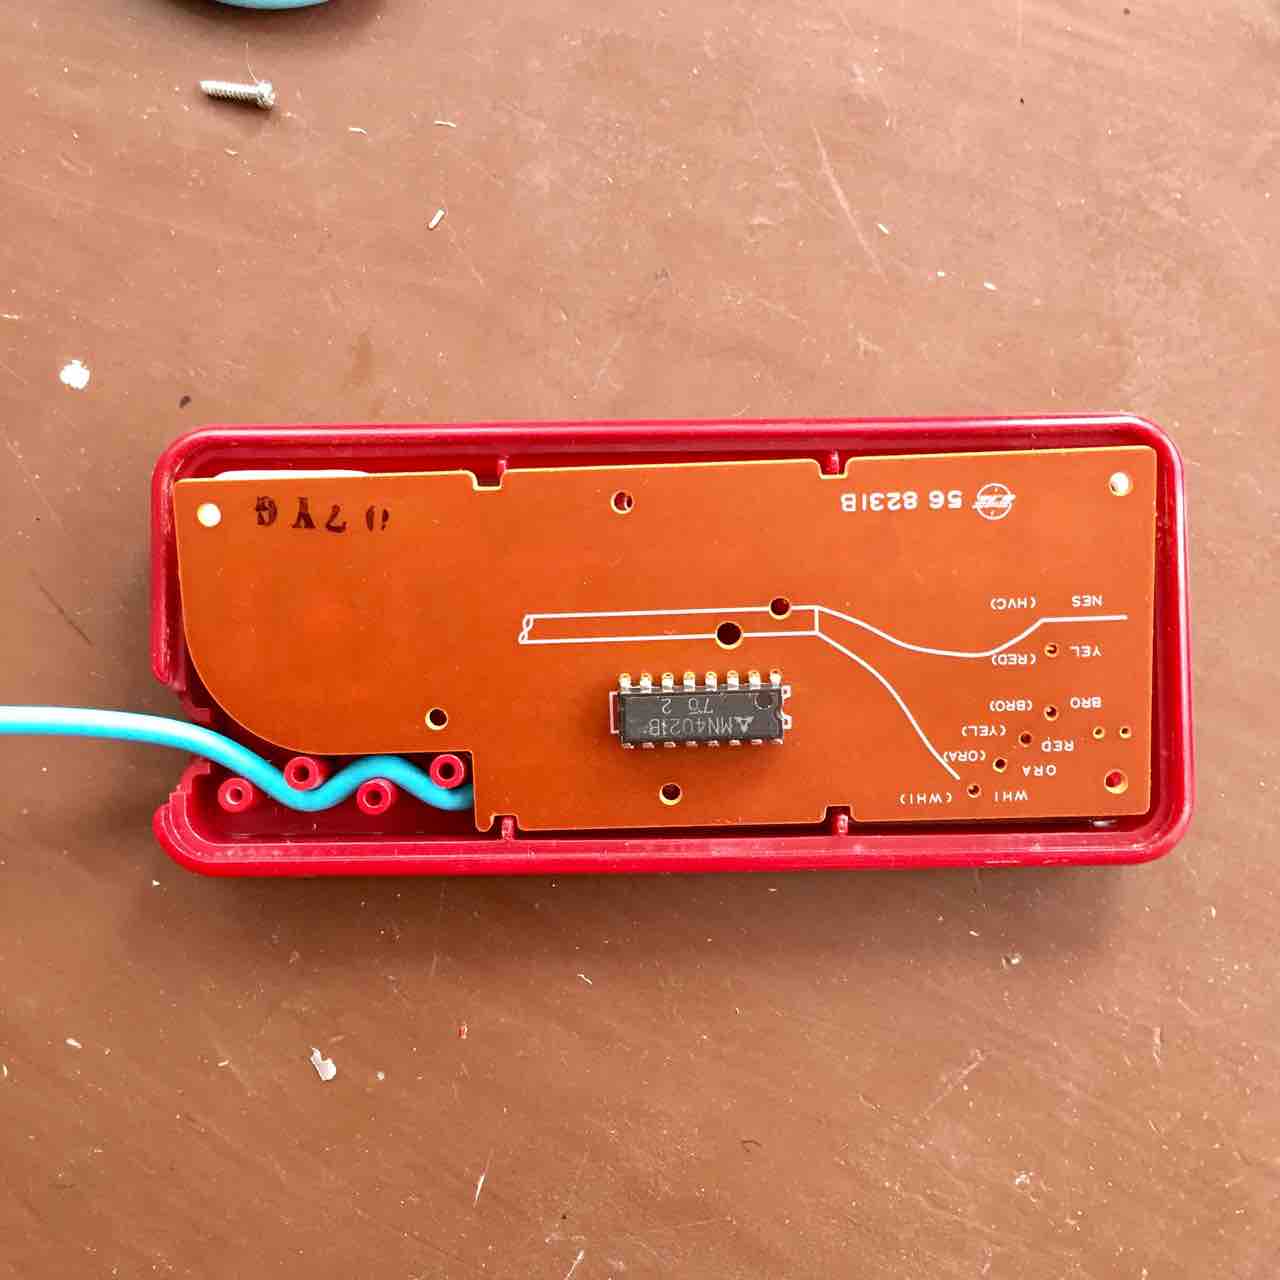
まずは基板の裏についているファミコン本体につながる配線を、取り外します。
次にarduinoと基板とを配線していきます。基板の右上の先ほど抜いた配線の穴と、ICのピンに配線します。

- 基板の右上のピン -> ArduinoのVCC
- 基板の右上から4つ目のピン -> ArduinoのGND
- ICの1番ピン(ICの足の一番右下) -> arduinoのIO9
- ICの4番ピン(右下から左へ4つめ) -> arduinoのIO2
- ICの5番ピン -> arduinoのIO3
- ICの6番ピン -> arduinoのIO5
- ICの7番ピン -> arduinoのIO4
- ICの13番ピン(ICの足の右上から左へ4つめ) -> arduinoのIO7
- ICの14番ピン -> arduinoのIO6
- ICの15番ピン -> arduinoのIO8
配線はこれだけです。
収納
USBケーブルの、持ち手の部分の厚みが邪魔で、蓋が閉まらないので、できるだけ薄くします。

ニッパで外装をむしり取りました。

arduinoを両面テープでコントローラに貼り付けし、マイコンボードと接する基板の部分にはショートを防ぐために、カプトンテープを貼っておきます。
基板が収まることを確認して蓋をしてネジを閉めれば、コントローラの改造は終了。

USBケーブルが、kazzoのキットにも使っている、余り物で水色なのがちょっといまいちですが、皆さんは黒いケーブルをお勧めします。
これ↓に付属のUSBケーブルです。

USBケーブル水色でしょ...
プログラム
ArduinoJoystickLibrary
ATmega32U4 Pro micro Arduino互換ボードを、パソコンからジョイスティックとして認識できるようにします。そのためにArduinoJoystickLibraryを使用します。
ArduinoJoystickLibraryのGitHubより、zipファイルをダウンロードして、展開します。「Joystick」というフォルダができるので、そのフォルダをArduinoのライブラリのフォルダに入れます。
macですと「書類」→「Arduino」→「libraries」の中へ入れるだけです。
arduinoの設定

ボードを設定します。「ツール」→「ボード」→「Arduino Leonardo」を選択します。
USBをパソコンに接続してください。

書き込むためのシリアルポートを設定します。「ツール」→「シリアルポート」に先ほど接続した「Arduino Leonardo」があるので、それを選択してください。
これでセットアップは終了です。
ジョイスティックのスケッチ
こちらのスケッチを丸ごとコピペしてください。
#include <Joystick.h>
Joystick_ Joystick(JOYSTICK_DEFAULT_REPORT_ID,JOYSTICK_TYPE_GAMEPAD,
 4, 0,                  // Button Count, Hat Switch Count
 true, true, false,     // X and Y, but no Z Axis
 false, false, false,   // No Rx, Ry, or Rz
 false, false,          // No rudder or throttle
 false, false, false);  // No accelerator, brake, or steering
void setup() {
 // Initialize Button Pins
 pinMode(2, INPUT_PULLUP);
 pinMode(3, INPUT_PULLUP);
 pinMode(4, INPUT_PULLUP);
 pinMode(5, INPUT_PULLUP);
 pinMode(6, INPUT_PULLUP);
 pinMode(7, INPUT_PULLUP);
 pinMode(8, INPUT_PULLUP);
 pinMode(9, INPUT_PULLUP);
 // Initialize Joystick Library
 Joystick.begin();
 Joystick.setXAxisRange(-1, 1);
 Joystick.setYAxisRange(-1, 1);
 Joystick.setYAxis(0);
 Joystick.setXAxis(0);
 Joystick.setButton(0, 0);
 Joystick.setButton(1, 0);
 Joystick.setButton(2, 0);
 Joystick.setButton(3, 0);
}
// Last state of the buttons
int lastButtonState[8] = {0,0,0,0,0,0,0,0};
void loop() {
 // Read pin values
 for (int index = 0; index < 8; index++)
 {
   int currentButtonState = !digitalRead(index + 2);
   if (currentButtonState != lastButtonState[index])
   {
     switch (index) {
       case 0: // UP
         if (currentButtonState == 1) {
           Joystick.setYAxis(-1);
         } else {
           Joystick.setYAxis(0);
         }
         break;
       case 1: // DOWN
         if (currentButtonState == 1) {
           Joystick.setYAxis(1);
         } else {
           Joystick.setYAxis(0);
         }
         break;
       case 2: // RIGHT
         if (currentButtonState == 1) {
           Joystick.setXAxis(1);
         } else {
           Joystick.setXAxis(0);
         }
         break;
       case 3: // LEFT
         if (currentButtonState == 1) {
           Joystick.setXAxis(-1);
         } else {
           Joystick.setXAxis(0);
         }
         break;
       case 4: // FIRE1
         Joystick.setButton(0, currentButtonState);
         break;
       case 5: // FIRE2
         Joystick.setButton(1, currentButtonState);
         break;
       case 6: // FIRE3
         Joystick.setButton(2, currentButtonState);
         break;
       case 7: // FIRE4
         Joystick.setButton(3, currentButtonState);
         break;
     }
     lastButtonState[index] = currentButtonState;
   }
 }
 delay(10);
}
これは、ライブラリに付属するサンプルプログラムのGamepadExampleをちょっといじって、4ボタンに対応させただけのコードです。このプログラムをコンパイルしてArduinoに書き込みます。
完成
これでUSB版本物ファミコンコントローラ(ゲームパッド)ができました!!USBケーブルの色が悔やまれます...
2018.10.3 黒いUSBケーブルに交換したら、本当にファミコンっぽくなりました!
早速ファミコンエミュレータで使えるか試してみましょう。
エミュレータにはMac用のOpenEmuという物を使いました。
コントローラの設定画面の「入力」に「Arduino Leonardo」が現れます。

Arduino Leonardoのマイコンボードがコントローラとして動作してくれています。
ここで各ボタンを設定していきます。ここまでできれば大丈夫!
遊ぶ

遅延も感じない良好な操作性です。まさにファミコンで遊んでいる!!っていう感覚です。画面もとても綺麗でとてもいいですね。
同様にIIコンも改造すれば2人で遊ぶとことができるかもしれません。簡単なので後で試してみたいと思います。
2018.9.17追加
IIコンも作っちゃいました↓!!
簡単なので、ファミコンエミュレータで遊ばれている方には、お勧めの改造です。
ファミコンコントローラUSB化のキットにしました。とても簡単にUSB化できます。こちら👇👇で販売しています。
関連記事


コメント